Life in Rehab is BACK! Get ready for a slew of new projects for the new year! We just can't promise we know what we're doing!

Visit Life in Rehab's new Etsy shop
And because we're good friends by now,
our readers get 25% off
by entering the promo code
REHAB when you make a purchase!
So deck out, do some early holiday gift shopping,
strut your stuff and make a statement!


I'm on a mission. If I have never EVER not once replied to your comments, you may want to check this out: No Reply?


Wednesday, September 30, 2009

Wreath Rehab

With my new house number urns dry and ready to plant, I thought a coordinating pop of color for the front door was in order. The pots were so sleek though that I didn't want to ruin the clean look with some fussy over-powering wreath; I have tons of those in storage from the 80's and 90's, don't you?


And that gave me an idea.


I went to my stash and pulled out a 24" grapevine circle then yanked all the sunflowers and bows off of it. There was plenty of Apple Green spray paint left over (I told you to get used to it). From there it was a matter of laying the wreath on my trusty Painting Picnic Table, spraying one side liberally (you will not need to worry about drips on this one guys!), flipping after 15 minutes, and spraying the second side. I held it up to check for anywhere I may have missed and made sure it was evenly coated in a luscious shade of green.


Here's the finished product! Simple, and my favorite price: basically free. I have a couple more grapevine circles that I keep eyeing; what would you think of silver for Hanukkah or Christmas?

I'll show you how it all looks together soon when I give the porch its Pretty in Paint finishing touches. Stay tuned!

Monday, September 28, 2009

Dude, Where's My House?


We had one of those solar powered house number things out front for the longest time to identify our domicile. Then one day the numbers started walking away. Pretty soon, we had none, and the Chinese food delivery guy kept driving right past us. I started looking into permanent numbers, but again I wanted something unique and personal. Unique and personal is not cheap.

While haunting the garden department at Kmart, I found the perfect solution: two plastic garden urns on clearance for $3 each.

You'll also need:

Contact paper

A computer and printer

Spray paint in your choice of colors

If your urns are plastic, use plastic primer. I'm majorly unimpressed with plastic paints

A sheet of glass

A flashlight

Scissors

Painters tape


First, determine the size of your urn. Mine are 14". The colors I wanted to use were a no-brainer, Apple Green and Spa Blue, get used to it. You'll want a color that contrasts sharply with the color of the pots, since the color of the pots will be the color of your house numbers. Then I went to the computer, decided what I wanted my urns to say, chose a font size and printed it out. Make it chunky; it'll be easier to work with.

Trace your printed numbers and words onto the contact paper. I cut out the numbers from the paper at first, then came up with the brilliant plan of putting a sheet of glass on my lap, laying the contact paper on top of the printer paper, and shining a flashlight up through the whole thing. Tracing was easy, but remember, glass is sharp and blood-red stripes might not be the best decorating idea for this project.

Next, cut out the letters and numbers from the contact paper. Decide how you want them positioned on the urns and mark lightly with a pencil. Peel off the back and carefully position them. Smooth them down completely flat and double smooth the edges.


If you're using plastic pots, prime them according to the directions.


I used two colors, so at this point I applied my first color, the green, and let that dry. Then I taped the green and painted the urns blue; as always, I used three light coats for each application, allowing it to dry in between.


l


Using a butter knife, I carefully pried up the contact paper and peeled it off. Let this dry overnight, and the next day create your front porch statement!


The Budget News:


2 Urns $6

Plastic Primer $4.50

2 Cans of spray paint $7

Contact paper $3


Totally Cool Receipt: $20.50.

Coffee Can Collection

We all have one: that "spot" where nothing seems to work. Mine was self inflicted. I decided I needed a shelf floating high above the mirror in my dining room. Awesome concept, since this house is majorly deficient in the storage area, but the shelf didn't command attention nor work as a display area due to its height.


Sam is a caffeine addict, so we always have coffee cans being emptied out. I'm not good at throwing them away, so we soon had three, and that gave me an idea.


First, I spray painted them Spa Blue. I gave them three coats and let them dry. Next, I crumpled up several sheets of newspaper into loose balls and stuffed each can fairly firmly. The silk flowers were already hanging around my house waiting for a new purpose in life, which they found when I tucked them in the cans and fluffed them up (They were originally from Michael's and ran me $1.50 per stem for 6). Voila!

The Budget News:

Coffee cans $FREE
Paint $3.50
Totally Cool Receipt: $3.50


I could change this seasonally as well. And the Hubster had the suggestion of Mod Podging some fruit crate labels on the cans. If I do, I'll share the results.


Sunday, September 27, 2009

Birdbath Bling

Learn this now: I'm cheap. I wanted a birdbath, but I also wanted something unusual, and I definitely wanted inexpensive. So a quick trip to Walmart was all I needed to gather the following:

14 inch terra cotta saucer $7
12 inch terra cotta saucer $5
Three 8 inch terra cotta pots $1 each
Apple Green spray paint $2.67
I bag of flat backed glass marbles $1.99

I always keep Plumbers Goop on hand. It dries clear, is waterproof, and stays slightly flexible, so it's the perfect adhesive for projects like this.
First, spray the inside of the large saucer with Spa Blue spray paint and let it dry. Next, assemble the three 8 inch pots as shown with the large saucer on the bottom using Plumber's Goop liberally. You want this to be a very sturdy seal. Let this dry as directed. Next, spray the whole thing Apple Green using three thin coats to avoid runs. Let dry completely.
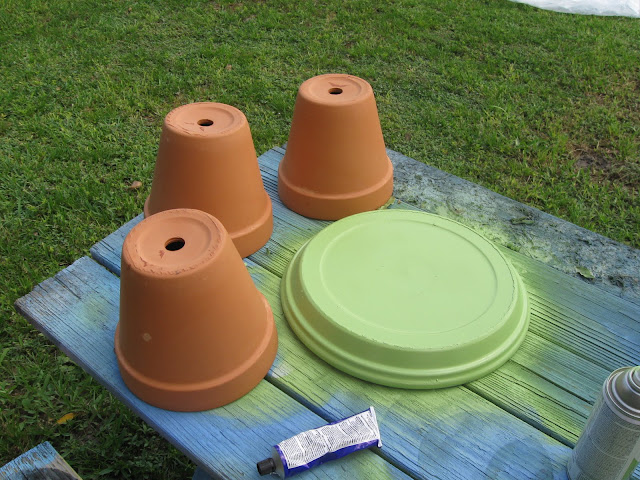


Now it's time for some bling! I used a few shell shaped flat backed marbles for the top row, and aqua clear marbles for the rest. These are also applied with Goop, holding each one for about ten seconds. See if any of the children lying around your house are bored and invite them to volunteer for this.


Ta Da!


 I did the shells around the rim of the 14 inch saucer, a spaced circle of the aqua marbles around the center pots, and then a tight ring around the base, but you can be creative and use as much or as little of the shiny stuff as you want. Let this set for about an hour, then flip over your birdbath, find the ideal spot in your yard, and enjoy! Total cost, under $20.

Sunday, September 6, 2009

Welcome to Rehab!

No, not that kind of rehab! I'm a woman who likes to take what I have and re-imagine, recreate, and re-purpose it. Rehabilitate it to something useful and attractive. Something about throwing perfectly good items out rubs me the wrong way- unless of course YOU do it, at which point I'll probably drag it home.

I'll also be doing crafts on the cheap and posting great finds from my favorite stores, so if you're on a shoestring budget or just like to brag about how little you spent, settle in and follow along