Pages

Thursday, October 29, 2009

Constant Views

When a good friend spotted an old window leaning on the trash can in someone's front yard, she immediately thought of me, pulled over, threw it in her trunk, and brought it straight to my house the next chance she got.

In other words, I'm now having trash delivered.

Not one to disregard the usefulness of anything, I stashed and hung onto the battered old window, waiting for inspiration to hit me, which it did at the next Coconut Grove Art Festival.

I saw a fantastic hanging piece that was an old double hung with a painted view of the beach through it. I was in love with the work itself, but not the $600 price tag.


A.C. Moore had just the view I wanted. I found a great print of a beach chair on sale for a mere $3. I then measured the full window opening. cut the view I loved on the poster using my quilting grid board (those come in handy or a lot more than quilts), and taped it to the back of the window. With the addition of a sawtooth hanger, I was done.

Or was I?


There was a good portion of the poster left, and I had some unused frames lying around. I found two that would just fit the leftover poster and spray painted them white. While that was drying, I positioned the glass from the frames over slices of scenery that would compliment the window, namely a stretch of sand and some surf, which I marked lightly with a pencil and cut.


Once the frames were dry, all that was left was to position and hang the trio!


Yes, yes, I know, the walls aren't done. Hey, the insurance check came today, so chill out, I'm getting to it! And yes, those cabinets are newly painted in Spa Blue, thank you.

Let There Be Light

I had two buffet lamps that I had just taken from a dated 90's finish to a matte silver with a little spray paint. I had even replaced the shades with some black silk ones I found on sale. All they needed then was a little rewiring, and the lighting in the dining room would be perfectly ambient.

They were, of course, in the room that caught fire. Ever seen a melted lamp?

I'm largely undauntable, so off I trotted to Walmart, where I scored these lovely candlesticks in the oddest shade of red for $3 each, and the matching snoozer shades for $3 as well, so $12 for the pair. I can work with that.


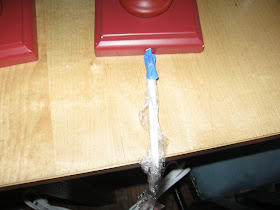
My handsome spouse looked up from World of Warcraft while I was taping the lamps just long enough to suggest I use clinging plasting wrap instead of newspaper. The man is a genius. Wrap the wrap, tape the ends, and you have a totally paint-proof seal. These went out in the yard for three light coats of Spa Blue to perfectly match the other accent pieces in the house.


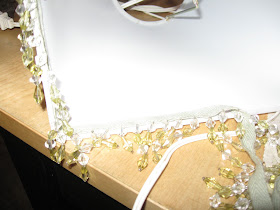
Next, I took bead trim by the yard and wrapped it around the bottom of the shades to determine how much I'd need, giving myself an extra inch. This comes on a ribbon. Depending on the ribbon's appearance and your taste, it can be afixed inside or outside the shade. I did a project similar to this with a funky hot pink ball fringe for Savannah's room, and the trim went on the outside to give the shade a finished effect. For this, I ran a thick bead of hot glue inside the shade, working 4 to six inches at a time, and pressed the ribbon carefully into the glue, keeping it uniform. Don't worry about those gossamer little glue-webs, they clean up easily when you're done.


This dries almost instantly, so within the hour, I had some new buffet lamps!

The Budget News:

2 lamps from Walmart on back-to-school clearance: $6
2 shades from the same collection: $6
Beaded trim by the yard from JoAnn's Fabrics and Crafts: $5
My favorite shade of spray paint: it only took half a can, so let's say $2
Totally Cool Receipt: $19

I can't wait until the electricity is back on in that part of the house to see how they look!

Tuesday, October 27, 2009

And You Thought You Needed to Remodel? Pfffffftttt

So let's start at square one, shall we? Here's what we have to work with:


Yes, this is what a burned out room looks like. The walls will have to come down, as well as the ceiling and floors, and all of what used to be possessions will need to be unceremoniously pitched into the back of a truck and hauled away.


Huge thank you to our contractor friend, Peter Helprin, who loaned his expertise, not to mention his Tundra.


Kids love those rare times when you encourage them to
destroy your home.


Don't forget your safety gear. I think my oldest went overboard.

Sunday, October 18, 2009

I Assure You We're Open

So, how did this idea to blog come about?

Well, simple: I was in high gear to get this house in shape, and having to post would certainly be motivational. So the projects began. Until August 16th.

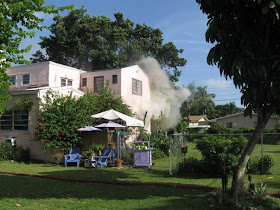
When the house caught on fire. Yes, that is smoke you see billowing from the windows.


The insurance company settled this last week, so there will be a flurry of activity in the next several weeks as I VERY painstakingly oversee and participate in the reconstruction of my unusual and interesting house.

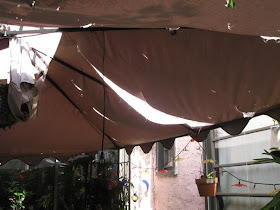
But the day before said fire, we did a quick makeover that involved removing our storm-damaged gazebo from the patio, putting up the new $70 model we scored at Big Lots half off the half off, and editing the furniture to a more pleasing grouping. The slender gent helping with the demolition is my youngest son, Thom. He likes to destroy. You're going to see a lot of him.


There you have it, my favorite room in the house. And with three teenagers, we'll be expanding outward to make sure everyone can get a quick slice of alone time. So what do you think?